DIRECT MAIL VS EMAIL MARKETING
“Technology is the future and print is dead.” We’ve all heard this proclaimation before. Whether or not it is actually true is another story. There are still many instances where print is necessary, especially for marketing purposes. Printed products are still one of the most effective marketing tools and will be for a very long time. Direct mail is vital to the marketing mix and helps brands increase brand awareness and business equity. If you are a business owner, you want to use what works and will drive traffic and sales to your business. Read on for three reasons that you should use direct mail over email marketing.
LESS COMPETITION
In this digital age, almost every company and brand utilizes email marketing. Think about how many emails you are subscribed to. How many do you actually open before deleting? The amount of emails that an office worker receives on average per day is over 100. To contrast that, the amount of actual mail sent has decreased. Think about how much actual mail you receive, not even daily, but weekly. That number should be drastically lower than the amount of emails received. One way to ensure that your business stands out in today’s market is by sending direct mail. Epsilon conducted a study that showed that 77% of consumers sort through their physical mail as soon as they get it. When hundreds of emails are received daily, many of them go unread and deleted. Your direct mail will have a better chance of being seen and read than an email.
PUTTING YOUR MESSAGE RIGHT IN THEIR HANDS
Referencing back to the Epsilon study, other results indicted that 73% of Americans and 67% of Canadian consumers said they preferred direct mail over email marketing because direct mail provides more convenience. The consumer can read that piece of mail at their own leisure. Consumers will save the direct mail they received in order to go back to it at a later time, unlike emails which get deleted almost automatically. Keep this in mind when designing your direct mail. Create your direct mail with the intent that the customer will hold onto it. Utilize various tactics to help ensure that your mail goes up on the fridge and not in the recycling bin. Some examples of design tactics that you can try include: Coupons – if you include a coupon for your consumer to redeem, that customer will have to keep it in order to utilize it. Attractive images – if your direct mail include striking images, your consumer might see it as a small piece of art they want to keep and put up
QUALITY OVER QUANTITY
Be creative when designing your direct mail. You want your design to accurately represent your brand and draw in customers. Remember that content is king and you should include all relevant information in an easy-to-read format. Direct mail will not be effective unless the content is useful to the consumer in some way. Utilize alluring images that will catch your consumer’s eyes. Always choose quality when creating your direct mail piece. Your printed material reflects your business so confirm that your printing source can print on high quality paper with the type of finish that best represents your design.
============================
Choosing the Right Mailing Services for You
Direct Mail Services
Mail large quantities in our one-stop-shop
Postcards, brochures, menus,rack cards and custom items
Rent a list from NextDayFlyers
EDDM®
Reach every home, every address in your target area
No postage permit needed
No list required
Direct Mail or Every Door Direct Mail® Printing Services?
Before you choose your direct marketing service, here are some questions you need to ask yourself:
What is the objective of my mailing campaign?
Do I have a specific group or a specific geographical area I want to target?
If I want to target a specific group of prospects, do I have a list available or do I need to get one?
Which type of marketing product do I want to send out as a mailer?
When do I need my campaign to be mailed?
Click the comparison tab to find the answers!
Related Articles:
Direct Marketing And Other Misunderstood Marketing Terms
Print And Mail Standard Or Custom Sizes Online – NextDayFlyers
EDDM® and EVERY DOOR DIRECT MAIL® are registered trademarks of United States Postal Service.
NextDayFlyers is an independent provider of Every Door Direct Mail® products that is not associated with nor sponsored by the United States Postal Service.
Slip-sheet and separate in sets of 100 pieces, $18 per 1,000 pieces plus postage fee of $0.183 per piece
https://www.nextdayflyers.com/mailing-services/

============================
Every Door Direct Mail® (EDDM®)
The ONLY WAY to deliver direct mail to every residential and business address.

Direct Mailing Just Got Simplified!
You don’t need an expensive list, a costly postage permit, and you can target every single door in your neighborhood. That’s the beauty of the simplified Every Door Direct Mail® (EDDM®) service by USPS. At an astounding 18.3¢ per postcard, it gives small businesses the chance to promote their products and services without all the cost and hassle that you typically associate with direct mail marketing. You don’t even need a mailing address.
Key Benefits of Every Door Direct Mail® (EDDM®)
- Small Business Price
With EDDM® you can mail your postcards and flyers for just 18.3¢. Compare that to traditional direct mailer campaigns that cost an average of 75¢ per piece for the smallest and most basic mailer promotion. - Deliver BIG Postcard Sizes
The amazingly low price of 18.3¢ per piece is applied to ANY size of mailer. As long as you keep within the postal size guidelines, you can send 8.5×11 postcards and larger for big impact postcards that stand-out in your customers mailbox. - No Postage Permit Needed
Normally when sending direct mail campaigns, you would need an active postal permit which can cost as much as $450 just to open an account. With EDDM®, you don’t need one. USPS provides a special USPS/EDDM® Endicia permit that you can add directly to your mailer designs. This special permit also ensures that your EDDM® mailers are mailed separately from the mass of “circulars” that people are not always fond of. - No Mailing List Needed
Instead of printing names and addresses, EDDM® utilizes a “simplified addressing” format that targets local postal customers in a radius of up to 5 miles. And because you no longer need to print names and addresses, you can forget all the typical ink-jet printing and labeling hassles. - Short-Run Mailing Campaigns
Create extensive local mailing campaigns or smaller mailing campaigns to test-the-water in your neighborhood. There is a 5,000 piece maximum per day, per post office but the minimum quantity to qualify is just 200 print pieces. - Direct Mail Works For Your Business
Direct mail is statistically one of the most effective forms of advertising for any business. It delivers a higher return-on-investment than any other medium. Every dollar spent on mailers returns an average of $12.57 in sales! And with 3-out-of-4 people reading direct mail, you are also guaranteed to get seen by the majority of people you send your mailers to.
Who is EDDM® for?
EDDM® is available to all companies and organizations who want to distribute promotions to the households and businesses in their entire neighborhood. It’s designed to get your marketing messages directly in the hands of customers – a low-cost way to tell people about your grand opening, your weekend sale, or your special offer.
EDDM® is particularly useful for local retail businesses and organizations that rely on walk-in custom and local business support.
This service is ideal for marketing:
- Arts & theater organizations
- Attorneys
- Auto dealers
- Banks & insurance agents
- Community groups
- Dry cleaners
- Grocery stores
- Real estate agents
- Restaurants
- …and all other local businesses
=====================================
EDDM® Printer
NextDayFlyers correctly separates and prepares your print promotions for EDDM® mailing campaigns
Here’s how we help you optimize your mailers for EDDM® promotion:
- We batch your mailers in USPS required sets of 100 (with slip-sheet separation) – ready for post office drop-off
- We supply the widest range of postcard sizes for EDDM® mailing – including large format sizes for higher-impact marketing
- We offer a range of stocks that includes 14pt ultra-thick, 100lb Cover, 100lb and 80lb glossy bookweight
- We provide high resolution offset printing for the price of digital – making your postcards durable, distinct and professional
- Next day printing available – get your prints delivered faster for your time-sensitive sales offers and event promotions
Every Door Direct Mail® (EDDM®) Products
We offer the most postcard products for your EDDM® promotions. The following products can be used to create successful EDDM® mailing campaigns:
- 6.5″x 9″ EDDM® Postcard Size
Compact-sized postcard – perfect for sales offers and discount mailers - 11″x 6.25″ EDDM® Postcard Size
Long flyer shape for stylish landscape or long-portrait promotions - 8.5″x 11″ EDDM® Postcard Size
Letter-sized-postcard – ideal for detailed sales messages, pamphlets, brochure mailers, and programs - 8.5″x 14″ EDDM® Postcard Size
Large postcard size for sales events, openings, and high-impact promotions
These are just a few ideas for print sizes but at NextDayFlyers you can create many more sizes within the following postal constraints:
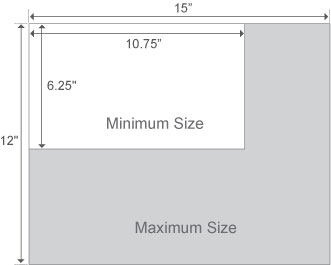
Don’t Forget to Add an EDDM® Indicia to Your Mailer Design
Before presenting your mailers to the post office for EDDM® mailing, you will need to add a USPS/EDDM® indicia image and an ECRWSS address to your designs.
Here is how your EDDM® address notation should look:

Print your EDDM® postcards with NextDayFlyers today and start targeting your neighborhood with biggest, boldest and most eye-catching postcards that customers can’t help but notice!
======================================
How to add these custom blocks to your Teachable sales page
- To start creating blocks using these templates, navigate to the admin area of your school, choose the course you want to edit, and select Sales Page from the sidebar. This will bring you to your sales page editor:

- Add a custom Liquid/HTML block by hovering over an existing block and choosing it from the selection wheel:

- Copy and paste the code from your chosen template into the new block.

- Customize the code to be specific to your course. In this section we’ll cover how to do this on each of the five templates, noting the customizable areas with instructions in red. You’ll also see examples of how the raw templates will look on a sales page.
The Personal Letter Block
This template allows you to feature your personal story in letter form, to address your visitors in a more personal way.
<div class="closing-letter-row">
<div class="container">
<div class="row">
<div class="col-xs-10 col-xs-offset-1 col-md-8 col-md-offset-2">
<h2 class="section-title">A Letter from [Instructor Name]<br>
<small>[Best-selling instructor or other tagline]</small></h2>
<p> </p>
<p>Put the content of your letter inside paragraph body tags.</p>
<p>Have multiple paragraphs by adding more paragraph tags and writing content inside them.</p>
<br>
<p>
—
<strong>John Doe</strong>, AwesomeCourse.com
</p>
<br><br><br><br><br>
</div>
</div>
</div>
</div>
The Featuring Insights Block
Have influential people contributed to your course? Did you include interviews in your course content? This block will allow you to highlight their profiles.
This template has space for eight featured people in two rows. To adjust according to how many people you’re featuring insights from, simply remove or add more of the sections that begin with <div class=”person col-sm-3 col-xs-11″> and end with </div>.
If you want to only have one row of people, remove one of the sections starting with <div class=”row”> all the way up until the next enter space.
<div class="featuring-row description-row">
 <div class="container">
   <div class="row">
     <div class="col-lg-12 col-md-12">
       <h1 class="section-title"><center>Featuring insights from:</center></h1>

       <div class="row">
         <div class="person col-sm-3 col-xs-11">
             <img class="large-img-rounded img-responsive" src="http://freelanceme.net/Images/default%20profile%20picture.png">
             <div class="point-description"><strong>First Person’s Name</strong><br><em>Made $1M+ with impressive course, Founder of Impressive Company</em></div>
         </div>
         <div class="person col-sm-3 col-xs-11">
             <img class="large-img-rounded img-responsive" src="http://freelanceme.net/Images/default%20profile%20picture.png">
             <div class="point-description"><strong>Second Person’s Name</strong><br><em>Made $1M+ with impressive course, Founder of Impressive Company</em></div>
         </div>
         <div class="person col-sm-3 col-xs-11">
             <img class="large-img-rounded img-responsive" src="http://freelanceme.net/Images/default%20profile%20picture.png">
             <div class="point-description"><strong>Third Person’s Name</strong><br><em>Made $1M+ with impressive course, Founder of Impressive Company</em></div>
         </div>
         <div class="person col-sm-3 col-xs-11">
             <img class="large-img-rounded img-responsive" src="http://freelanceme.net/Images/default%20profile%20picture.png">
             <div class="point-description"><strong>Fourth Person’s Name</strong><br><em>Made $1M+ with impressive course, Founder of Impressive Company</em></div>
         </div>
       </div>

       <div class="row">
         <div class="person col-sm-3 col-xs-11">
             <img class="large-img-rounded img-responsive" src="http://freelanceme.net/Images/default%20profile%20picture.png">
             <div class="point-description"><strong>First person in second row</strong><br><em>Made $1M+ with impressive course, Founder of Impressive Company</em></div>
         </div>
         </div>
         <div class="person col-sm-3 col-xs-11">
             <img class="large-img-rounded img-responsive" src="http://freelanceme.net/Images/default%20profile%20picture.png">
             <div class="point-description"><strong>Second person in second row</strong><br><em>Made $1M+ with impressive course, Founder of Impressive Company</em></div>
         </div>
         <div class="person col-sm-3 col-xs-11">
             <img class="large-img-rounded img-responsive" src="http://freelanceme.net/Images/default%20profile%20picture.png">
             <div class="point-description"><strong>Third person in second row</strong><br><em>Made $1M+ with impressive course, Founder of Impressive Company</em></div>
         </div>
         <div class="person col-sm-3 col-xs-11">
             <img class="large-img-rounded img-responsive" src="http://freelanceme.net/Images/default%20profile%20picture.png">
             <div class="point-description"><strong>Fourth person in second row</strong><br><em>Made $1M+ with impressive course, Founder of Impressive Company</em></div>
         </div>
       </div>

       <br><br>
     </div>
   </div>
 </div>
</div>

<style>
/* Featuring Insights From */
.featuring-row h2.section-title { margin-top: 0px; }
.featuring-row .large-img-rounded { width: 120px !important; height: 120px !important; margin-bottom: 15px; }
.featuring-row .person { text-align: center; margin-bottom: 20px; margin-top: 50px; font-size: 15px; line-height: 23px; }
.featuring-row .person em { font-weight: 200; }
.featuring-row .bonus { font-style: italic; font-size: 25px; margin-top: 50px; font-weight: 200; text-align: center; }
.featuring-row .color-bold { color: #57986d; font-weight: bold; }
.featuring-row .bonuses .point { margin-top: 50px; margin-bottom: 30px; }
.featuring-row .bonuses .point img { height: 35px; }
.featuring-row .bonuses .point .point-description { line-height: 26px; margin-bottom: 10px; }
</style>
The Multiple Instructors Block
If your course is taught by multiple instructors, use this template to feature their names, photos, and bios.
<div class="container block-padding">
   <div class="row">
       <div class="col-xs-1 visible-xs"></div>
       <div class="col-lg-8 col-lg-offset-2 col-xs-10 col-md-8 col-md-offset-2 col-sm-10 col-sm-offset-1">
       <h2>Your Instructors</h2>
       <br>
       <!-- AUTHOR ONE -->
       <div class="instructor-single row">
           <div class="col-lg-2 col-md-2 col-sm-2 text-center">
               <img class="large-img-rounded img-responsive" src="http://freelanceme.net/Images/default%20profile%20picture.png">
               <div class="author-name">
                   Author One
               </div>
           </div>
           <div class="col-lg-9 col-md-8 col-sm-8">
               <p><strong>John Doe</strong> is the Co-Founder at Impressive Company. Previously, he taught people how to do impressive things. He has a cat and loves animals.</p>
           </div>
       </div>
       <!-- AUTHOR TWO -->
       <div class="instructor-single row">
           <div class="col-lg-2 col-md-2 col-sm-4 text-center">
               <img class="large-img-rounded img-responsive" src="http://freelanceme.net/Images/default%20profile%20picture.png">
               <div class="author-name">
                   Author Two
               </div>
           </div>
           <div class="col-lg-9 col-md-8 col-sm-8">
               <p><strong>John Doe</strong> is the Co-Founder at Impressive Company. Previously, he taught people how to do impressive things. He has a dog and loves animals.</p>
           </div>
       </div>
       <br>
     </div>
 </div>
</div>
<style>
.block-padding {
   padding-top: 50px;
   padding-bottom: 50px;
}

.instructor-single {
   padding-bottom: 30px;
}

.instructor-single p {
   font-size: 16px;
}

.author-name {
   font-weight: bold;
   margin-top: 5px;
}
</style>
The Recent Results Block
With this template, you can add more social proof to your sales page by featuring names, photos, and quotes from students who have taken your course and enjoyed it or been successful.
<div class="featuring-row recent-results-row">
 <div class="container">
   <div class="row">
     <div class="col-lg-8 col-md-8 col-lg-offset-2 col-md-offset-2">
       <h2 class="section-title recent-results-title">Recent Results</h2><br>
       <div class="row">
         <div class="person col-sm-3 col-xs-11">
             <img class="large-img-rounded img-responsive results-image" src="http://freelanceme.net/Images/default%20profile%20picture.png">
             <div class="point-person"><strong>John Doe</strong><br><em class="site-name"><a href="http://example.com" target="_blank">Impressive Course Course</a></em></div>
         </div>
         <div class="person col-sm-9 col-xs-11">
           <p class="point-description">Quote about the course. Lorem ipsum dolor sit amet, consectetur adipiscing elit, sed do eiusmod tempor incididunt ut labore et dolore magna aliqua.</p>
         </div>
       </div>
       <br><br>
       <div class="row">
         <div class="person col-sm-9 col-xs-11">
           <p class="point-description">Quote about the course. Lorem ipsum dolor sit amet, consectetur adipiscing elit, sed do eiusmod tempor incididunt ut labore et dolore magna aliqua.</p>
         </div>
         <div class="person col-sm-3 col-xs-11">
             <img class="large-img-rounded img-responsive results-image" src="http://freelanceme.net/Images/default%20profile%20picture.png">
             <div class="point-person"><strong>John Doe</strong><br><em class="site-name"><a href="http://example.com" target="_blank">Impressive Course Course</a></em></div>
         </div>
       </div>
     </div>
   </div>

 </div>
<style>
.recent-results-row { text-align: center; padding-top: 50px; padding-bottom: 50px; background-color: #ecf0f1; }
.recent-results-row .recent-results-title { margin-bottom: 13px; }
.recent-results-row .results-image { margin-bottom: 20px; width: 100px; }
.recent-results-row .point-person { line-height: 20px; }
.recent-results-row .point-description {
 font-size: 16px;
 line-height: 25px;
 padding: 20px 18px;
 background: #fff;
 border-radius: 5px;
 border: 1px solid #ccc;
 margin-top: 2px;
}
.recent-results-row .site-name { font-size: 14px; margin-top: 3px; display: block; }
</style>
The Dynamic FAQ Block
This template allows you to create a dynamic FAQ section, where students can simply click on the question to reveal the answer.
This one is a little different in that you won’t modify the template itself to change or add content. Instead, go into your original FAQs block to add or modify questions to your liking. This template will pull content from that block. When you’re done making changes, delete the original FAQs block (so you don’t have two of them showing up on your sales page) and save your changes.
If you want to add or modify questions in the future, simply add the original FAQs block back in, make the changes, and delete it again. Any changes you make will apply to this block.
<div class="faq-row padded-section">
   <div class="container">
       <h2><center>Frequently Asked Questions</center></h2>
       <br>
       <br>
       <div class="row faq-question">
         {% for cq in course.course_questions %}
           <div class="question-wrapper col-md-8 col-md-offset-2">
             <h3 class="question"><a data-toggle="collapse" data-target="#question_{{ cq.id }}" href="javascript:void(0);" class="plus-toggle"><span class="plus">+</span> {{ cq.question }}</a></h3>
             <div class="collapse answer" id="question_{{ cq.id }}">
             {{ cq.answer }}
             </div>
           </div>
         {% endfor %}
       </div>
   </div>
</section>
<style>
.faq-row .faq-question { text-align: left; margin-bottom: 30px; }
.faq-row .faq-question .question-wrapper {
   border-bottom: 1px solid #E7E7E7;
   padding-bottom: 20px;
}
.faq-row span.plus { color: orange; }
.faq-row .faq-question h3.question { line-height: 30px; margin-bottom: 4px; }
.faq-row .faq-question .answer { font-weight: 200; font-size: 16px; line-height: 27px; }
</style>
How you can take this further